Blog Design: Optimize for User Experience and Aesthetics
In Stage 4, we focus on creating an eye-catching blog design that is essential for attracting and retaining readers, as it sets the tone for their overall experience on your site.
If you haven’t installed WordPress yet, head over to Stage 2 for my simple WordPress installation guide.
Now that you’ve mastered the basics, it’s time to dive into the exciting details! WordPress is a powerful platform that allows you to build your blog design exactly how you envision it.
Do you feel like your blog design could use a little pizzazz? No worries! In this step, I’ll guide you through transforming your layout and design, along with some fantastic tips and tricks to make your blog truly one-of-a-kind.
Basic Blog Design
Every blogger has a unique vision for their site. One of the amazing features of WordPress is its ability to completely change your blog design and layout with just a few clicks. Here are some stunning free WordPress designs you can choose from!
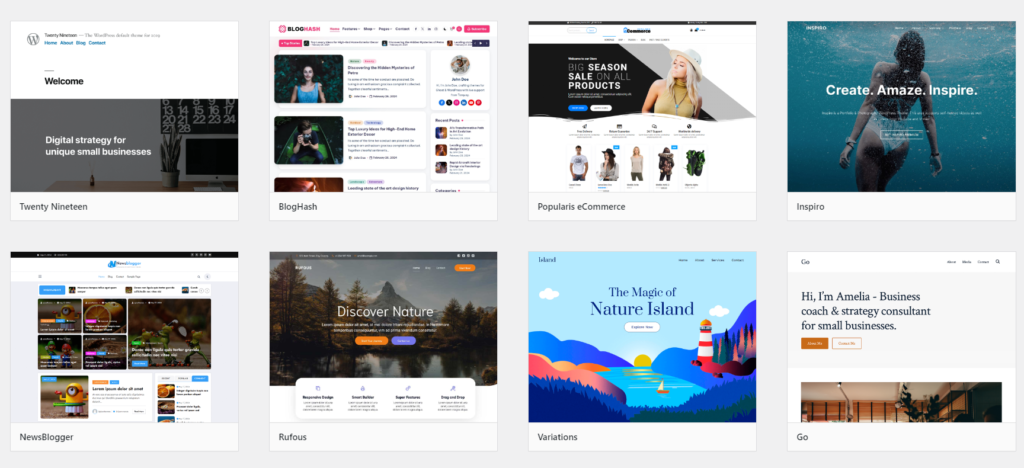
In WordPress, the layout of your site is determined by a “Theme.” Themes dictate the overall look and feel of your blog. To switch your theme, simply click on the “Appearance” tab in the left-hand menu.
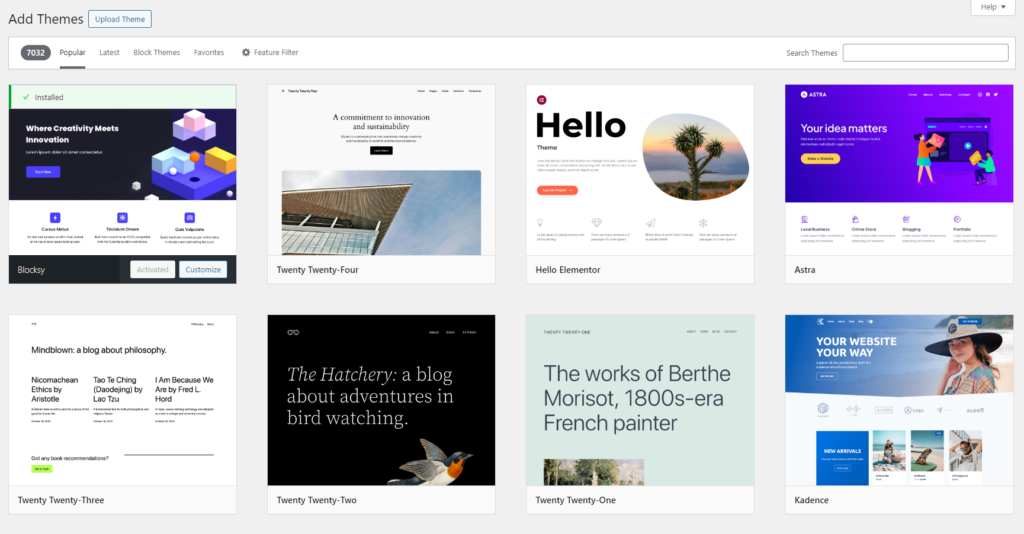
You’ll find several themes pre-installed, like Twenty Twenty-Three and Twenty Twenty-Four. These themes offer a simple, clean aesthetic that suits nearly any type of blog. In fact, many successful bloggers around the world rely on these themes.
If the default themes don’t quite resonate with your style, don’t fret! There are thousands of additional free themes available for you to explore and install.
While the default themes are handy, for a modern and highly customizable look, let’s remove those and install the Blocksy theme instead. Blocksy is lightweight, fast, and packed with design options that will help your blog design stand out.
To download and activate it, navigate to the “Appearance” tab, select “Themes,” click “Add New,” search for “Blocksy,” and then click “Install” followed by “Activate.”

There are plenty of ways to find the perfect theme that aligns with your style! Use the “Feature Filter” to search by color, layout, and other criteria. Simply check the boxes for your desired features and click “Apply Filters” to see the results.
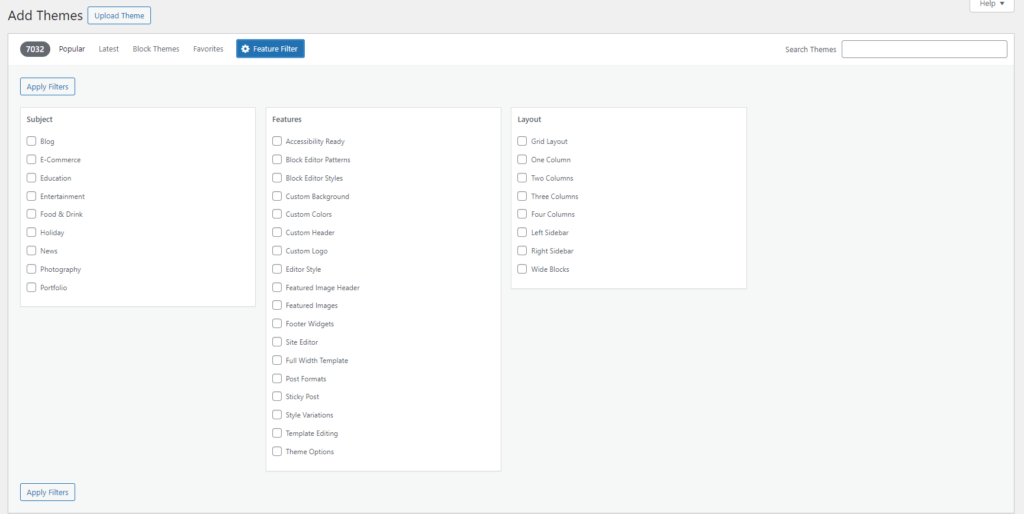

Now you can explore themes that match your chosen features. When you find one you like, simply hover over it and click the blue “Install” button.
Now you can browse through themes that match your preferences. When you find one you love, just hover over it and click the blue “Install” button.
Once the theme is installed, click “Activate” to make it live on your blog. To see your new theme in action, head over to your site and take a look!
So, how do you want to theme your blog?
Creating Menus
The next step is to set up a simple navigation menu so your readers can easily access key sections of your site through menu links.
To create your menu, go to the “Appearance” tab in the left-hand menu of your blog’s admin area, then select “Menus.”
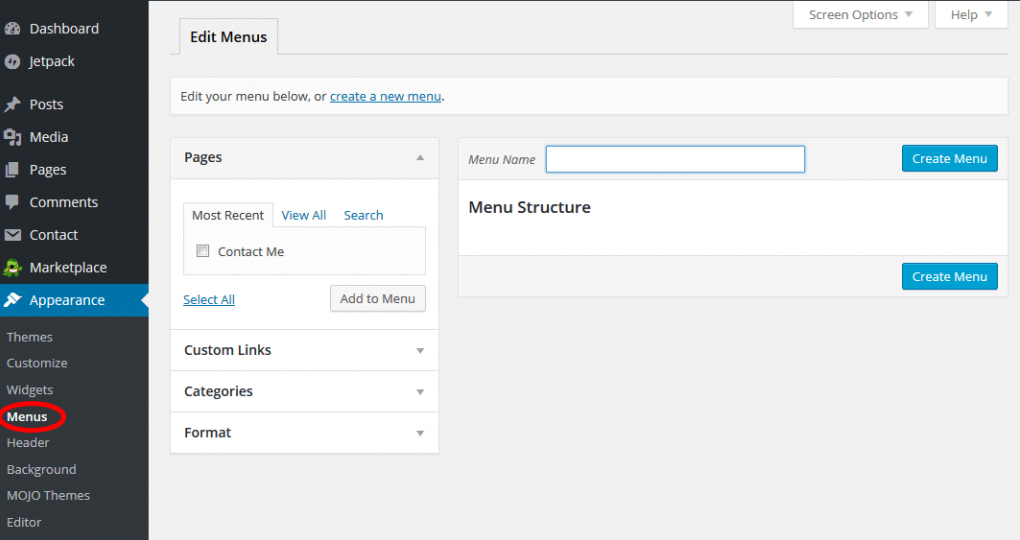
Let’s create a new menu titled “Main Menu.” Enter that name in the “Menu Name” box and then click “Create Menu.”
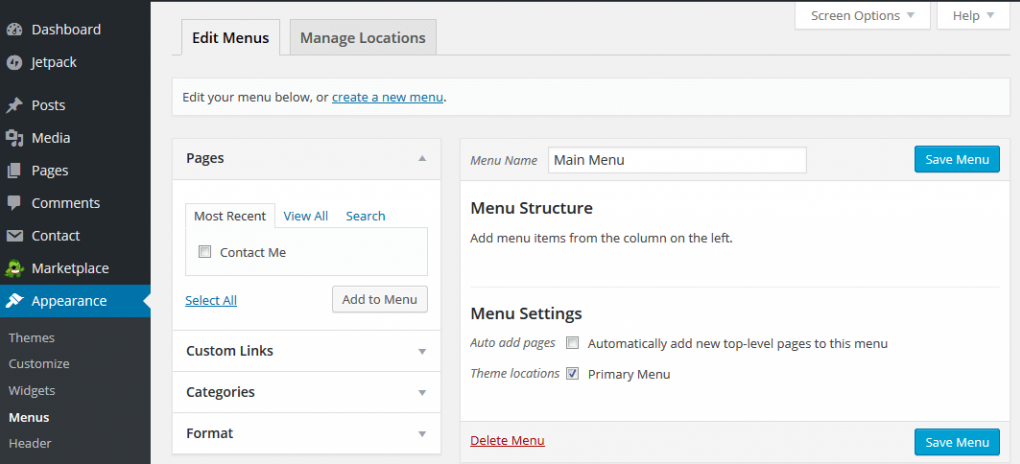
Now we can start adding items to this menu. For this example, I’ll begin by including a link to the homepage of my blog.
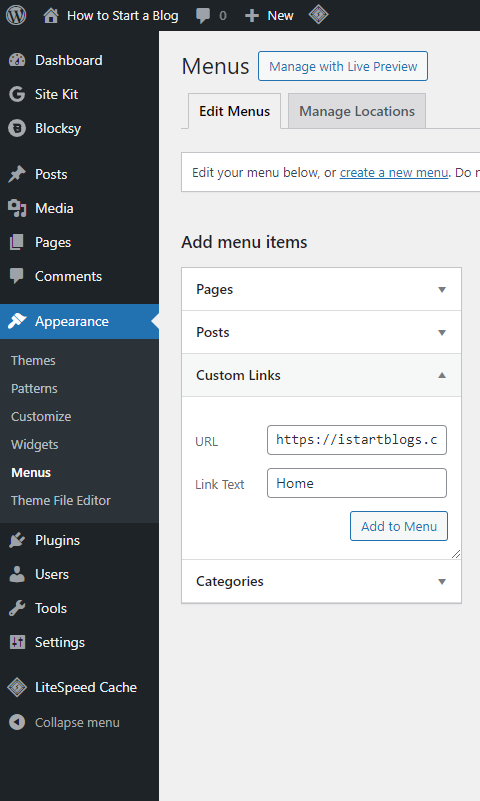
To do this, I’ll click on “Custom Links.” Then, I’ll enter the URL of my blog’s homepage, which is simply your domain name prefixed with “https://” (without quotes). For our example, I’ll be using https://istartblogs.com/.
Next, you’ll need to input the “Link Text,” which is the text you want displayed in the menu for the link to your homepage. I’ll label this link as “Home.”
After entering your URL and link text, click “Add to Menu.”
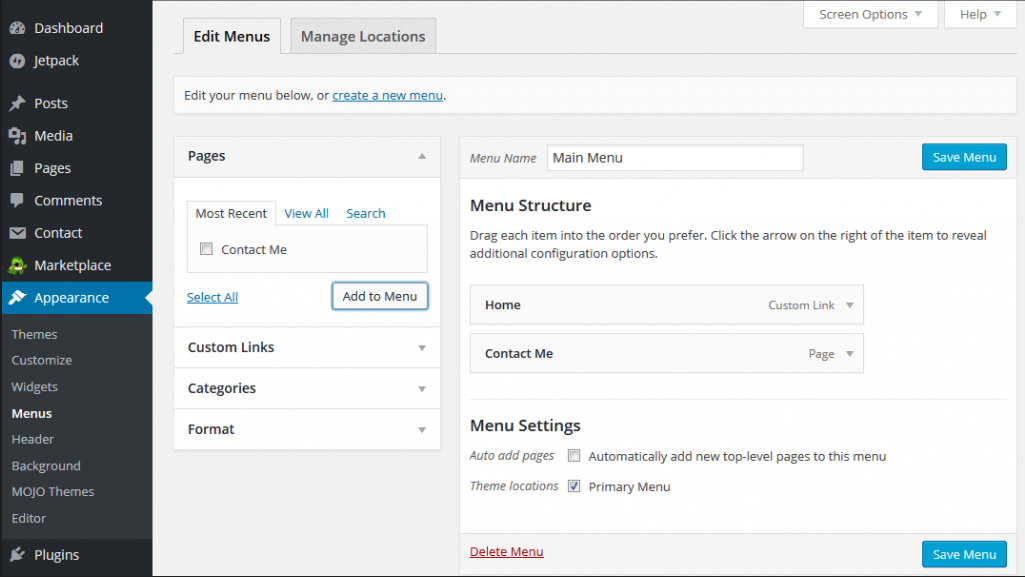
Let’s add another item to the navigation menu. This time, I’ll add a link to a page I created earlier.
To begin, click on the “Pages” section in the menu editor.

This will display all the pages you’ve created so far. If you haven’t created any pages yet, this section might be empty or may show a “Sample Page.” To create a new page, simply go to “Pages” on the left menu of your blog’s admin area and select “Add New.”
In this example, I’ll add a page titled “Contact Me” to the menu. I’ll check the box next to that page, click “Add to Menu,” and then hit “Save Menu” to apply these changes.
With the menu created, it’s time to add it to your blog design. Go to the “Manage Locations” tab, and select the “Primary Menu” area from the drop-down for our “Main Menu.” Once you’ve chosen it, click “Save Changes” to make it live.

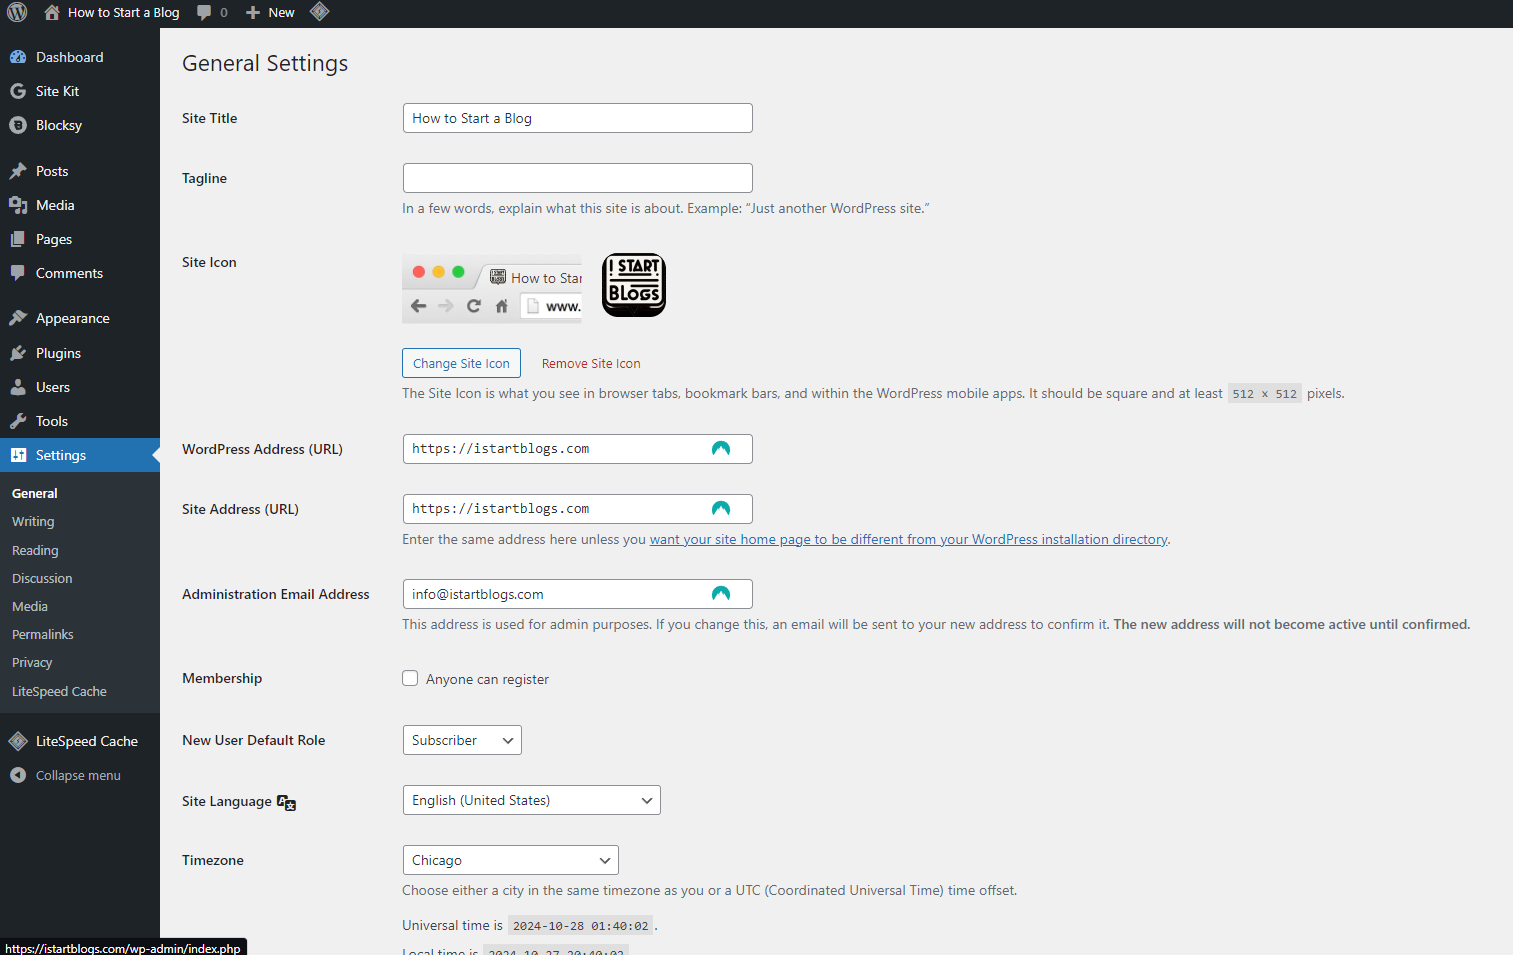
To ensure your WordPress site uses “https://” instead of “http://,” start by accessing your WordPress dashboard. Navigate to the “Settings” tab and click on “General.” In the “WordPress Address (URL)” and “Site Address (URL)” fields, make sure both URLs start with “https://.” After updating, scroll down and click “Save Changes.” It’s also a good idea to install an SSL certificate, which is often provided by your hosting provider, to secure your site.
Customizing Your Blog Design
With your basic blog design and navigation in place, you can now personalize the look and feel even more. Head over to the Appearance tab in the left menu of your blog’s admin area and select Customize.
You’ll be taken to a screen displaying your blog’s homepage on the right, with the customization options on the left. Note: If you’re using a different theme than shown here, you may see slight variations in your customization options.
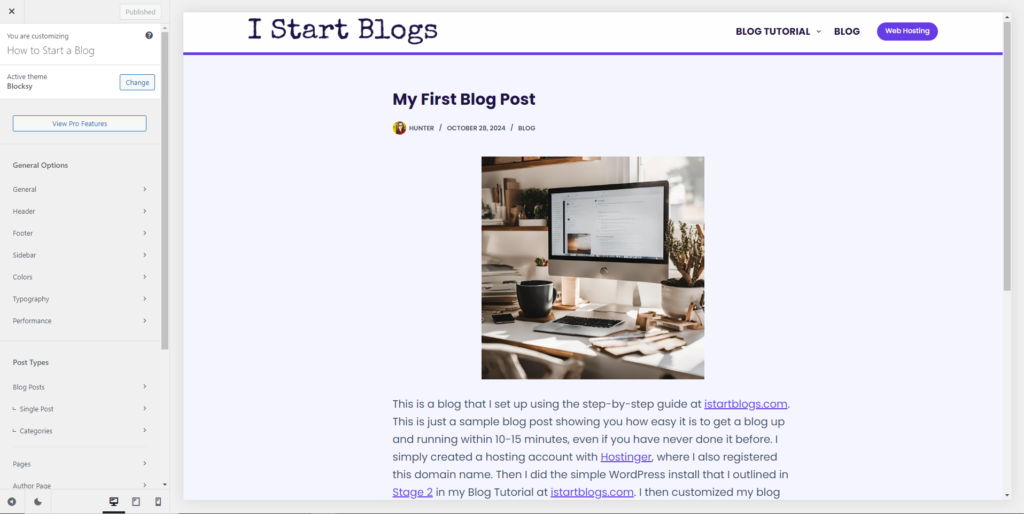
This screen offers a range of customization options. Let’s go through each one step-by-step.
General Options
General
In this section, you can adjust site-wide elements, like layout width, container padding, and element spacing. This lets you control the overall structure of your site—whether you prefer a full-width or boxed layout, for instance. You can also set your default sidebar position (right, left, or none) and configure breakpoints for mobile views, ensuring a responsive blog design on all devices.
Header
The header is one of the most important visual elements on your blog, setting the tone for the rest of your site. Here, you can:
- Adjust Layout: Choose from different header layouts, including sticky headers, transparent headers, and multiple rows for complex designs.
- Customize Content: Add or remove elements like logos, menus, search bars, and social icons.
- Style Options: Choose background colors, transparency, and padding to create the exact header look you want. Blocksy’s header builder makes it easy to drag and drop header elements, giving you control over each item’s positioning.
Footer
The footer often includes essential site information, such as contact links or social media icons. Blocksy allows you to:
- Add Multiple Rows: Create a tiered footer with separate rows for icons, menus, or custom text.
- Customize Content: Add widgets, text, or HTML to display any additional information you want.
- Style Footer: Adjust colors, padding, and width to ensure a clean, cohesive look that matches the rest of your blog design.
Sidebar
This section controls the visibility and placement of sidebars across your site. You can choose where you want sidebars to appear (e.g., on posts, pages, or both), set the width of the sidebar, and position it on the left or right side of your content. This is a great way to ensure your blog design fits your desired structure.
Colors
This area lets you customize your blog design’s color scheme across all elements, creating a cohesive visual identity. You can:
- Set primary and secondary colors that are applied across buttons, links, and other accent areas.
- Adjust background colors for different sections, such as the header, footer, and content areas.
- Configure hover colors and text colors for different types of content to ensure readability and visual appeal.
Blocksy’s color settings allow for real-time previews so you can instantly see how each color change affects the site.
Typography
Typography is a crucial aspect of your blog design’s readability and style. In this section, you can:
- Select Fonts: Blocksy integrates with Google Fonts, giving you a wide variety of font choices.
- Adjust Font Sizes: Set font sizes for headers, body text, and other elements.
- Customize Line Height and Letter Spacing: Fine-tune the spacing within text elements to improve readability.
- Font Weight: Choose different font weights (e.g., light, bold) for different sections of your blog design, creating a visually appealing text hierarchy.
These settings are applied globally, ensuring consistency in font style across all pages and posts.
Performance
Here, you can enable or disable options that enhance your site’s load speed and overall performance. Blocksy’s performance options include:
- Lazy Loading: Load images only when they come into view, which reduces initial page load time.
- CSS and JavaScript Minification: Compress these files to reduce their size and improve site speed.
- Disable Animations: Optionally turn off animations to streamline your site for a more minimal, faster experience.
- Remove Emoji Scripts: Blocksy can disable WordPress’s emoji script, which can marginally improve load time.
These optimizations help your blog run faster, providing a better user experience for your readers.
Post Types
Blog Posts
The Blog Posts section controls how your blog post archive or listing pages appear. You can:
- Customize Layout: Choose between grid, list, or masonry layouts for a visually organized look.
- Display Settings: Adjust settings for featured images, author bio visibility, and date display.
- Excerpt Length: Control how much text from each post appears on archive pages, giving readers a sneak peek of each post.
Single Post
In this section, you control the appearance of individual blog posts. Options include:
- Post Meta Data: Show or hide elements like author names, publish dates, categories, and tags.
- Featured Images: Set featured images to appear in the header or within the content itself.
- Related Posts: Enable or disable related post links at the bottom of each post, encouraging readers to explore more of your content.
Categories
Customize how category archive pages appear, with options for layout and whether featured images or post excerpts are displayed.
Pages
Here, you can set default layouts and styles for individual pages. Blocksy allows you to:
- Adjust Page Layouts: Choose between full-width, boxed, or with sidebar layouts.
- Enable/Disable Breadcrumbs: Show or hide breadcrumb navigation on pages.
- Page Title Customization: Control the appearance of page titles, such as font size, weight, and alignment.
Author Page
This section controls the layout and information on author archive pages, where readers can view all posts by a specific author. You can:
- Add Author Bio: Display a short bio along with the author’s picture and social media links.
- Post Layout: Choose a layout for displaying posts on the author’s page, keeping it consistent with other archive pages.
Search Page
This option customizes the look of your search results pages. You can:
- Post Excerpts: Display excerpts with each search result for added context.
- Result Layout: Set the layout and decide which post elements to display, such as featured images and publish dates.
Core Settings
Site Identity
This is where you can configure your site title, tagline, and logo. It’s essential for setting up your blog’s brand identity. Additionally:
- Site Icon: Upload a favicon, which is the small icon appearing on browser tabs and bookmarks.
Menus
The Menus section lets you manage your site’s navigation. You can:
- Create and Assign Menus: Designate primary, footer, and sidebar menus for easy navigation.
- Reorder Menu Items: Drag and drop menu items to rearrange links in any order you like.
Widgets
Widgets add functionality to your sidebar, footer, or other widgetized areas. Here, you can:
- Add Widgets: Display recent posts, categories, social media icons, search bars, and more.
- Arrange and Customize: Position widgets as you like and set custom titles or icons for each.
Homepage Settings
This option lets you decide what appears on your homepage:
- Choose Homepage Display: Display your latest posts or a custom static page.
- Set Homepage and Blog Page: Select which page should be the homepage and which page should serve as the main blog post archive.
Additional CSS
For those comfortable with CSS, this section allows you to enter custom CSS to make further stylistic changes not covered in the theme options.
Adding Plugins
Enhancing Your Blog’s Functionality
Recommended Resources for Learning More about Plugins
WordPress.org Documentation: Visit WordPress’s official documentation on plugins for a deeper understanding.
Blogs & Tutorials: Check out reputable sources like WPBeginner, Kinsta, and Yoast’s blog for guides on plugins.
Community Support Forums: For questions on specific plugins, the WordPress community forums can be an excellent resource for solutions.
What Are Plugins?
Definition & Purpose: Plugins are add-ons you can install on your WordPress blog to expand its functionality or add new features. They’re like apps for your blog, giving you access to additional tools that can enhance its capabilities.
How Plugins Work: WordPress plugins are designed to be simple to install and manage, allowing you to customize your blog’s functionality without any coding skills.
Why Plugins Matter for Your Blog
Customization & Flexibility: Plugins empower bloggers to personalize their sites to suit their needs, whether for adding an image gallery, creating an online store, or optimizing for search engines—all without custom development.
Examples of Plugin Features: Plugins can handle a wide range of tasks. For instance, some allow visitors to share your content on social media, some enhance your blog’s SEO, and others give you in-depth site analytics.
Essential Plugins for New Bloggers
Recommended Plugins: Here are a few categories of plugins to help get your blog up and running:
- SEO Optimization: Plugins like Yoast SEO and Rank Math improve your site’s search engine visibility.
- Social Media Integration: Use Social Snap or Social Warfare to add easy-to-use social sharing buttons.
- Spam Protection: Akismet Anti-Spam helps keep your comments free of spam, protecting your blog and readers.
- Security & Backups: Wordfence offers security features, and UpdraftPlus allows you to easily back up and restore your site.
- Performance Enhancement: Plugins like WP Super Cache or W3 Total Cache improve page loading speeds.
- All-In-One Solution for Beginners: Jetpack provides a user-friendly suite of tools, including social sharing, analytics, and image optimization.
How to Find the Right Plugin for Your Blog
Using the Plugin Directory: Access the WordPress Plugin Directory directly in the admin panel (Plugins > Add New) to browse available plugins by keyword.
Browsing by Category & Popular Plugins: WordPress offers filters like “Popular” or “Recommended” to make finding the right plugin easier.
Evaluating Plugins: When considering a plugin, check user ratings, reviews, compatibility with your WordPress version, and active installations to gauge quality and reliability.
Step-by-Step Guide to Installing a Plugin
Accessing the Plugins Page: Go to “Plugins” > “Add New” in your WordPress admin panel.
Finding and Installing: Use the search bar to find a specific plugin. Once you find it, click the Install Now button.
Activating the Plugin: After installation, click Activate to enable it on your site.
Configuring Plugin Settings: Many plugins come with settings that you can customize. Locate the plugin in the left menu or in “Settings” and configure the options to suit your blog’s needs.
Managing and Updating Plugins
Keeping Plugins Updated: Regular updates improve functionality and address security risks. Visit the “Plugins” page to see available updates and apply them when needed.
Deactivating & Deleting Plugins: If a plugin is no longer necessary, deactivate it from the Plugins page, and delete it to keep your site streamlined and improve performance.
Using a Plugin for Updates: For ease, you might use a plugin like Easy Updates Manager to automate or manage your plugin updates.
Avoiding Plugin Overload
Best Practices for Plugin Use: While plugins add valuable features, using too many can slow down your site. Limit plugins to essential ones and avoid redundancy by choosing plugins with multiple functions.
Checking Plugin Impact on Performance: After adding new plugins, it’s wise to test your site’s speed using tools like Google PageSpeed Insights or GTMetrix to ensure they’re not negatively impacting performance.
Changing Your User Details
Why Updating User Details Matters
Customizing your user details is a simple yet crucial step in enhancing your blog design. By adding your name, bio, and profile image, you create a personal touch that helps readers connect with the person behind the content. Additionally, keeping your contact information updated is vital for security, making it easier to recover your account if necessary.
Accessing the User Details Page
To start updating your details, log in to your WordPress dashboard.
- In the left-hand menu, click on “Users” and select “Profile” or “Edit” under your username.
- This will take you to the profile settings page, where you can edit various fields.
Key Details to Update
- Display Name and Nickname
- Under the “Nickname” field, enter the name you want readers to see.
- In the “Display name publicly as” dropdown, select this nickname so it appears on your blog posts.
- Your display name is the name readers will see on each post, playing a significant role in your blog design. For a more branded experience, choose a name that reflects your blog’s theme or tone.
- In the “Nickname” field, enter the name you want readers to see. Then, in the “Display name publicly as” dropdown, select this nickname to ensure it appears on your blog posts.
- Email Address
- Make sure this email is current, as it’s essential for receiving important notifications about your site and for password recovery.
- Biographical Information
- Many WordPress themes support an “About the Author” section beneath each post. This section allows you to provide a short bio, giving readers more insight into you and your blog’s purpose. Fill in this field to introduce yourself and enhance your blog design.
- Profile Picture
- For a personal touch on your blog design, upload a profile image via Gravatar. Once set, this image will appear next to each post you author, adding a face to your writing and helping to connect with your audience.
Security and Privacy Tips
- Secure Password
- To ensure your blog design remains safe, choose a strong password and change it periodically. A secure password should include a mix of uppercase letters, lowercase letters, numbers, and symbols to protect your site from unauthorized access.
- Public or Shared Computers
- If you access your blog on a shared computer, remember to log out when you’re finished. This step is crucial for preventing unauthorized access and maintaining the integrity of your blog design.
Additional Profile Customization (Optional)
Depending on your theme and installed plugins, you may find additional customization fields that enhance your blog design:
- Social Media Links: Add links to your social profiles, allowing readers to connect with you across platforms and promoting engagement.
- Contact Information: Some themes support including your phone number or other contact details, facilitating direct outreach from your audience.
- Display Preferences: Customize dashboard colors and layout to match your personal style or improve readability, contributing to a more cohesive blog design experience.
Saving and Reviewing Changes
After you’ve made your updates to enhance your blog design, scroll down and click “Update Profile” to save your changes. Once saved, visit your blog and view a post to see how your name, bio, and image now displayed to readers, ensuring your blog design effectively reflects your personal brand.
Other User Management Options (Optional for Advanced Users)
As your blog grows, you may want to invite other contributors to collaborate on your blog design. WordPress offers various user roles, such as Author and Editor, each with distinct permissions. While managing contributors isn’t essential for new bloggers, understanding these roles can be beneficial for enhancing your blog design in the future.
Maintaining Your Blog Design Consistency
Periodically revisit your user profile to ensure all details are up-to-date. Keeping your information current, secure, and aligned with your blog design will help you create a positive and consistent impression on your readers.
Changing Your URLs
Understanding Permalinks for Your Blog Design
Permalinks are the permanent URLs to your individual blog posts and pages, playing a crucial role in structuring your site’s content. A well-structured permalink enhances your blog design by improving user experience and search engine optimization (SEO). Clear and readable links are easier to share and remember, significantly boosting your blog’s overall usability.
Default Permalink Settings
When you first install WordPress, it comes with a default permalink format that may not be ideal for most bloggers. For example, a typical default permalink might look like this: https://www.theblogstarter.com/?p=123.
While this format functions correctly, it has several drawbacks:
- Lack of Readability: URLs that contain numbers and parameters are not easily readable by users.
- Less Informative for Search Engines: Search engines prefer descriptive URLs that convey information about the content.
- Negative Impact on SEO: A poor URL structure can hinder your site’s search engine ranking and visibility.
Accessing Permalink Settings
To enhance your blog design by changing your permalink structure, follow these steps:
- Navigate to the Settings tab on the left menu of your WordPress admin dashboard.
- Click on Permalinks. This action will bring up the permalink settings screen, where you can customize your URL structure for better usability and SEO.
Choosing the Right Permalink Structure
You’ll see several options for permalink structures:
- Plain:
https://www.theblogstarter.com/?p=123 - Day and name:
https://www.theblogstarter.com/2023/10/28/sample-post/ - Month and name:
https://www.theblogstarter.com/2023/10/sample-post/ - Numeric:
https://www.theblogstarter.com/archives/123 - Post name:
https://www.theblogstarter.com/sample-post/(recommended) - Custom Structure: Allows you to create your own URL format.
Recommendation: The “Post name” structure is often the most preferred choice. It’s:
- User-friendly: Readers can easily understand the content just by looking at the URL.
- SEO-friendly: Search engines favor descriptive URLs that include relevant keywords.
- Memorable: A clean URL is easier for readers to remember and share.
Customizing Permalinks
If the default permalink options don’t align with your vision for blog design, you can create a Custom Structure. Here’s how:
In the Custom Structure field, you can include elements like category names, post names, or even tags. For example, use /%category%/%postname%/ to create category-specific URLs that enhance your site’s organization and usability.
Best Practices for URL Creation
- Include Keywords: Use relevant keywords in your permalinks to enhance your SEO efforts.
- Keep It Short and Descriptive: Aim for concise URLs that accurately reflect the content of your post.
- Avoid Special Characters: Steer clear of spaces and special characters, as they can complicate the URL.
Updating Existing URLs
Changing the URLs of existing posts can impact your SEO. If you decide to change URLs, keep the following in mind:
- Impact on SEO: Changing a permalink can result in broken links, which may negatively affect your site’s SEO performance.
- Setting Up Redirects: To maintain SEO rankings and avoid losing traffic, it’s essential to set up 301 redirects from the old URL to the new one. This informs search engines and users that the page has permanently moved.
The Importance of Custom Permalinks for Effective Blog Design
Customizing your permalinks is a vital step in enhancing your blog design and overall professionalism. By selecting a well-structured URL format, you not only improve your blog’s SEO but also enhance user experience, making it easier for visitors to find and share your content. Take the time to experiment with different permalink structures to discover the one that best complements your blog’s design and functionality!
Stage 4 Recap
Congratulations! You’ve made significant progress in how to start a blog by successfully enhancing your blog design. This stage equipped you with the skills to create a visually appealing and user-friendly platform that enhances your readers’ experience.
- Choose a Theme: You selected a theme that aligns with your blog’s purpose and audience, ensuring a cohesive look and feel that attracts and retains visitors.
- Customize Your Blog’s Layout: You learned how to tailor your blog’s layout, including menus and widgets, making it easy for readers to navigate and discover the content they love.
- Install Essential Plugins: By installing key plugins, you enhanced your blog’s functionality, from improving SEO to optimizing performance and ensuring security.
- Create Important Pages: You developed crucial pages such as an About page and a Contact page, establishing a connection with your audience and providing them with essential information about your blog.
- Optimize for User Experience: You focused on optimizing your blog design for a seamless user experience, ensuring that your site loads quickly and is mobile-friendly, which is vital in today’s digital landscape.
Next Stage
In the next stage, we will dive into Start Writing Your Blog. You’ll learn how to create compelling content that not only captures your audience’s attention but also complements your blog design. Let’s explore the steps to write your first post and establish your unique voice in the blogging community!
